
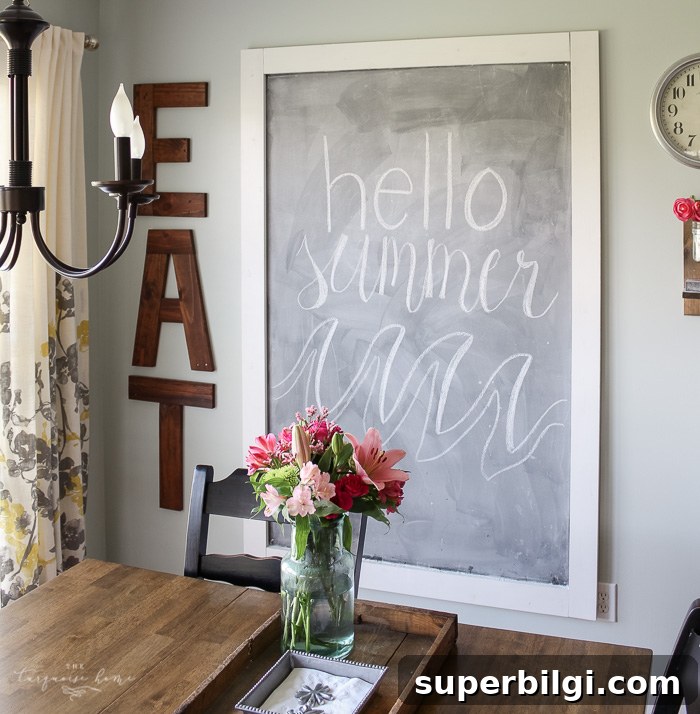
Make this easy DIY giant magnetic chalkboard with just a few tools and a little bit of time. It’s perfect for inspirational quotes, seasonal messages, or a place for kids to play.
I’d been wanting a large chalkboard ever since I saw one in Jess’s kitchen on The Macs last fall. Her huge chalkboard inspired me, and when I found a can of chalkboard paint at a neighborhood yard sale for $2, I finally got serious about making one of my own.
While researching, I learned that you can make a chalkboard magnetic by painting a magnetic primer beneath the chalkboard paint. Magnetic primer is available at most hardware stores and seemed like the perfect solution for storing magnetic letters and numbers for Miss A, since we don’t have a magnetic refrigerator. The results were mixed—read on for what worked and what didn’t.
This post contains affiliate links for your convenience. See my full disclosure policy.
Supplies to Make a DIY Giant Magnetic Chalkboard
Here are the supplies I used:
- 4 x 6 Masonite/hardboard, 1/8 inch thickness (I had the hardware store cut two feet off a 4 x 8 board.)
- Rustoleum magnetic primer paint (optional — skip if you don’t need magnetism)
- Chalkboard paint
- 1 – 1×4 at 8 feet long (cut into two 4-foot pieces for transport)
- 2 – 1×4 at 6 feet long (or any moulding for the frame)
- Chalk
- 2 D-ring hangers
- 1/2 inch screws and nails
- Level
- Circular saw (handy for small projects)
- Paint for the frame
- Wall anchors
This wall in our house was begging for a big focal piece, and a large chalkboard felt just right. I wanted something functional that could also be a decorative statement.
Steps for Making a Giant Magnetic Chalkboard
1. Paint the Masonite or Hardboard with Magnetic Primer
I brought the hardboard inside and temporarily nailed it to the wall so I could paint it without working on the floor. I taped newspaper behind the board to protect the wall.
Magnetic primer needs thorough stirring so the magnetic particles are evenly distributed. I stirred well and applied four thin coats, using every drop I had to maximize magnetic strength.
Result: larger magnets stick well, but smaller magnets slid down the board. If you want reliable magnetism for small refrigerator-style magnets, plan to use strong magnets or skip the magnetic primer and stick with regular primer to save money.
2. Paint the Board with Chalk Paint
After the magnetic primer dried, I waited the recommended time and applied two coats of chalkboard paint. Thin, even coats give the best finish and help prevent brush marks.
3. Season the Chalkboard
Wait at least 24 hours before seasoning. To season the surface, rub the side of a piece of chalk over the entire board and then erase it. This prevents your first message from becoming a permanent mark. It’s a messy step—expect some chalk dust—but it’s worth it for clean, erasable writing.
4. Cut the Boards for the Chalkboard Frame
After seasoning, I removed the board from the wall and laid it flat in the garage to measure and cut the trim. The 6-foot pieces worked perfectly for the long sides, and I trimmed the 4-foot pieces slightly for the top and bottom. I didn’t miter the corners—simple butt joints worked fine for this project.
5. Paint or Stain the Frame Pieces
With the trim cut to size, I painted the four frame pieces with white trim paint I already had. I propped the boards up with push pins to keep them off the paper while drying so they wouldn’t stick.
6. Attach the Frame to the Chalkboard with Screws
Once the trim was dry, I set the unpainted side of the frame face up and placed the chalkboard on top. I secured the chalkboard to the frame with screws, making sure everything was square and flush.
7. Attach Hangers to the Back of the Chalkboard and Hang It Up
I screwed two D-ring hangers into the back and used heavy-duty wall anchors to hang the piece securely. If you have studs, anchor into them for the most secure mount.
And that’s it—my very own giant magnetic chalkboard. It cost roughly $50 total; the magnetic primer accounted for about $20 of that. Skipping the primer and using standard primer would reduce cost even further.

I quickly wrote a favorite verse on the board and plan to practice chalkboard lettering and calligraphy to refine the look. The possibilities are endless—seasonal art, grocery lists, reminders, or a place for the kids to play and learn.
More posts you might enjoy:
- 15 Fabulous Chalkboard Ideas
- Spring Is Coming — Chalkboard Art
- DIY Chalk and Eraser Holder for a Chalkboard
- Hello Fall Chalkboard Art
- How to Budget for Home Projects