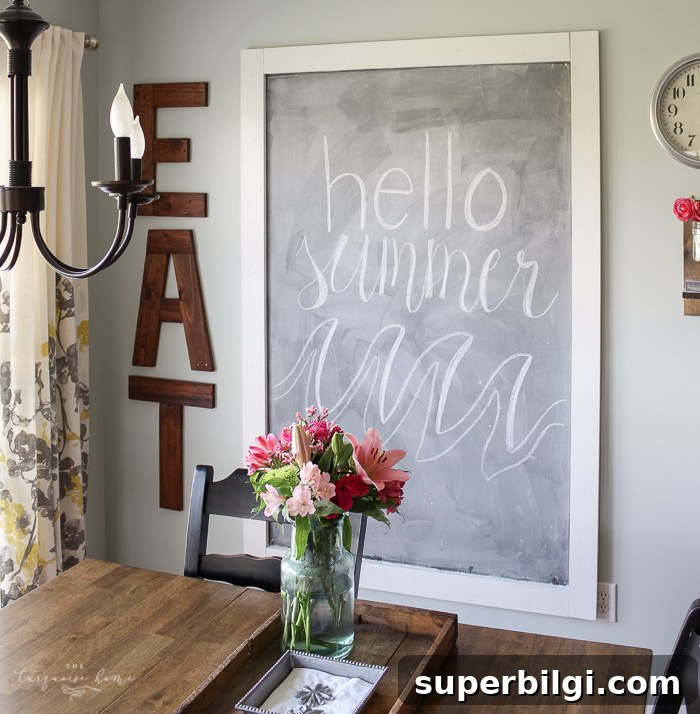
Create an easy DIY giant magnetic chalkboard with just a few tools and a little time. It’s ideal for inspirational quotes, seasonal messages, or a large family command center.
I’ve wanted a large chalkboard ever since I admired one in a friend’s kitchen last fall. After scoring a can of chalkboard paint at a neighborhood sale for $2, I decided to make my own oversized piece. Along the way I discovered magnetic primer, which promised to make the board magnetic when painted underneath the chalkboard finish. That idea was exciting because I don’t have a magnetic fridge and wanted a place for magnetic letters and notes. Read on for the full process, tips, and what to expect from magnetic primer.

This post originally contained affiliate links for convenience; any destination links have been removed here.
Supplies to Make a DIY Giant Magnetic Chalkboard
Here are the materials I used and recommend for a sturdy, attractive chalkboard:
- 4 x 6 Masonite / hardboard, 1/8 inch thickness — I had the store cut two feet off a 4 x 8 sheet to create a board that fit my wall and vehicle; many hardware stores will cut sheets for free or a small fee.
- Magnetic primer paint — optional if you want the board to accept magnets. Stir thoroughly and use multiple thin coats for best results.
- Chalkboard paint — for the final writing surface.
- 1×4 lumber, one 8-foot and two 6-foot pieces — these form the frame; you can also use molding if you prefer a different profile.
- Chalk for seasoning and writing.
- Two D-ring hangers for hanging the finished piece.
- 1/2 inch screws and nails to assemble the frame and attach the board.
- Level to ensure a straight installation.
- Circular saw for cutting trim pieces to length.
- Paint or stain for the frame.
- Heavy-duty wall anchors appropriate for your wall type.
Before: an empty section of wall that begged for a focal point. A large chalkboard fills that role perfectly and adds both function and style.
Steps for Making a Giant Magnetic Chalkboard
1. Paint the Masonite or Hardboard with Magnetic Primer
I brought the hardboard into the house and temporarily tacked it to the wall to make painting easier. Taping newspaper behind the board protected the wall from drips. Magnetic primer must be stirred very well and often while working so the iron particles remain evenly suspended. I applied four thin coats, allowing recommended drying time between coats, and used the entire can to maximize magnetic strength.
Result: larger, heavier magnets stick reliably, but small magnets slid down the surface. Magnetic primer can provide some hold, but its strength varies by brand and the number of coats. If you mainly want a chalkboard and don’t need magnetic functionality, you can skip the magnetic primer and use a standard primer instead.
2. Paint the Board with Chalk Paint
After the primer fully dried, I waited the recommended time (usually a few hours) and applied two coats of chalkboard paint. Use even strokes, maintain a wet edge, and allow sufficient drying time between coats. Two thin coats produce a smoother, more durable writing surface than a single thick coat.
3. Season the Chalkboard
Most chalkboard paints require a curing period before first use. I waited 24 hours, then seasoned the board by rubbing the side of a piece of chalk across the entire surface and wiping it off. This prevents your first writing from etching permanently into the surface. Note: seasoning is dusty—lay down drop cloths and expect to clean up some chalk dust.
4. Cut the Boards for the Chalkboard Frame
With the board seasoned, I removed it from the wall and laid it flat to measure and cut the frame trim. The 6-foot boards worked well for the long sides; the 8-foot board cut into two 4-foot pieces fit the top and bottom after trimming a few inches. If you have the tools, mitered corners give a cleaner, more finished look; straight cuts work fine for a simple frame.
5. Paint or Stain the Frame Pieces
I brought the four frame pieces inside and painted them with white trim paint I already had. To avoid sticking to the work surface, I propped the boards up with push pins while painting. Allow the paint to dry fully before attaching the frame to the board.
6. Attach the Frame to the Chalkboard with Screws
Place the painted sides down on the floor, set the chalkboard on top, and screw the frame pieces to the back of the board. Use screws long enough to secure the frame without penetrating through the front. Countersink screws or fill and touch up any visible holes for a neat finish.
7. Attach Hangers to the Back of the Chalkboard and Hang It Up
Screw two D-ring hangers into the back of the frame and hang the board using heavy-duty wall anchors suited to your wall. Double-check with a level to ensure the board sits straight. If your board is large or heavy, consider mounting it to studs or using multiple anchors for safety.
And there you have it: a DIY giant chalkboard that adds character and function to a large wall. Total cost for my project was about $50, largely because I used magnetic primer. Without the primer, material costs drop noticeably. The finished board works beautifully for seasonal lettering, grocery lists, family messages, and — with the right magnets — displaying notes and magnetic letters.
I wrote one of my favorite verses on the board and plan to practice chalkboard lettering for fancier seasonal designs. With a few additional tools and a little practice, you can create attractive, versatile chalkboard art for any room.
More posts you may enjoy:
- 15 Fabulous Chalkboard Ideas
- Spring Is Coming — Chalkboard Art
- DIY Chalk and Eraser Holder for a Chalkboard
- Hello Fall — Chalkboard Art
- How to Budget for Home Projects